Checkerboard Cake Recipe: A Stunning Dessert for Any Occasion
Introduction to Checkerboard Cake
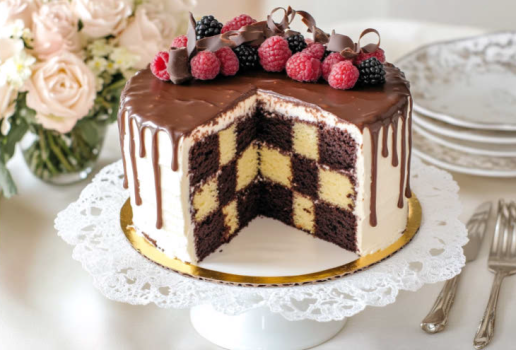
If you’re looking for a show-stopping dessert that will impress your guests and bring a bit of fun to your baking routine, a Checkerboard Cake is the perfect choice. This delightful cake is known for its striking pattern, resembling a checkerboard when sliced. Not only does it look spectacular, but it also offers a unique combination of flavors, often featuring a mix of vanilla and chocolate layers. As a result, this cake is a great way to showcase your baking skills and add a creative twist to your usual repertoire.
Checkerboard cakes are surprisingly simple to make, despite their intricate appearance. With a few specific tools and some basic cake-baking knowledge, you can create this beautiful dessert in your kitchen. Whether you’re an experienced baker or a newbie looking for a challenge, this recipe provides detailed instructions that will help you achieve a perfect checkerboard pattern. Additionally, this cake can be customized to suit various dietary needs, such as gluten-free, dairy-free, or vegan options, making it versatile for any guest list.
In this recipe, we’ll guide you through the process step-by-step, ensuring that you have all the information needed to bake a flawless checkerboard cake. So, grab your apron and get ready to create a dessert that not only tastes amazing but also adds a wow factor to any occasion!
Benefits and Advantages of Checkerboard Cake
The Checkerboard Cake stands out for several reasons, making it a fantastic choice for any event or celebration:
1. Visual Appeal
The main attraction of a checkerboard cake is its stunning visual appeal. The alternating squares of cake create a striking pattern that’s revealed when you cut into it, adding an element of surprise and delight to your dessert table. Therefore, this makes the cake perfect for special occasions like birthdays, anniversaries, or any event where you want to make a lasting impression.
2. Flavor Versatility
One of the best aspects of a checkerboard cake is its flavor versatility. Traditional recipes often use vanilla and chocolate, but the possibilities are endless. For example, you can experiment with flavors like strawberry, lemon, or even matcha to create a unique taste profile. The contrasting flavors and colors enhance the checkerboard effect, making each slice as delicious as it is beautiful.
3. Customizable for Dietary Needs
Another significant advantage of the checkerboard cake is its adaptability to various dietary requirements. With simple substitutions, you can make the cake gluten-free by using gluten-free flour, or dairy-free by using plant-based butter and milk. Furthermore, vegan options are also easy to achieve by replacing eggs with flaxseed or chia seed mixtures. This flexibility ensures that all your guests can enjoy a slice of this delightful cake.
4. Fun and Engaging to Make
Making a checkerboard cake can be a fun and engaging activity, especially if you enjoy baking with family or friends. The process of creating the checkerboard pattern is like a puzzle, requiring a bit of creativity and precision. Moreover, it’s a great project to involve kids in the kitchen, allowing them to learn about baking and explore their artistic side.
5. Impressive Without Being Overly Complex
Despite its impressive appearance, a checkerboard cake is not as difficult to make as it seems. With the right tools—a checkerboard cake pan set or homemade templates—and a bit of patience, anyone can create this cake. The recipe provided here simplifies the steps, making it accessible for bakers of all levels.
Ingredients Overview
Essential Ingredients for Checkerboard Cake
To make a delicious checkerboard cake, you’ll need the following ingredients:
For the Cake Batter:
- All-purpose flour – 2 ¾ cups (345g), or use a gluten-free flour blend for a gluten-free version.
- Baking powder – 1 tablespoon (15g), to help the cake rise and become fluffy.
- Salt – ½ teaspoon, to enhance the flavors.
- Unsalted butter – 1 cup (227g), softened. For dairy-free, use plant-based butter.
- Granulated sugar – 1 ¾ cups (350g), for sweetness.
- Eggs – 4 large, at room temperature. For a vegan cake, replace with 4 flax eggs (1 tablespoon flaxseed meal + 2 ½ tablespoons water per egg).
- Vanilla extract – 2 teaspoons, for flavor.
- Milk – 1 cup (240ml), or any plant-based milk for a dairy-free option.
- Cocoa powder – ¼ cup (25g), for the chocolate batter.
For the Frosting:
- Buttercream frosting – You will need about 3 cups (720ml). This can be made with butter or a dairy-free version using plant-based butter.
- Chocolate ganache – Optional, for a rich chocolate coating or drip.
Dietary Substitutions to Customize Your Checkerboard Cake
To cater to different dietary needs or ingredient availability, consider these substitutions:
Gluten-Free Checkerboard Cake
- Replace the all-purpose flour with a 1:1 gluten-free flour blend that includes xanthan gum. This ensures the cake maintains a similar texture and structure.
Dairy-Free Checkerboard Cake
- Substitute the butter with a plant-based alternative, and use almond milk, soy milk, or oat milk instead of regular milk.
Vegan Checkerboard Cake
- Replace each egg with a flax egg (1 tablespoon flaxseed meal mixed with 2 ½ tablespoons water). Allow it to sit for a few minutes until it thickens.
- Use vegan butter or coconut oil in place of regular butter.
Low-Sugar Checkerboard Cake
- Replace half of the granulated sugar with a sugar substitute like erythritol or stevia. Be mindful that the texture may change slightly with this substitution.
Flavor Variations
- Experiment with different extracts, such as almond or peppermint, instead of vanilla for a unique twist.
- Add food coloring to the vanilla batter to create a colorful checkerboard pattern, perfect for themed parties or holidays.
How to Prepare the Perfect Checkerboard Cake: Step-by-Step Guide
Follow these detailed steps to create a stunning and delicious checkerboard cake:
First Step: Prepare Your Baking Pans
Preheat your oven to 350°F (175°C). Grease three 8-inch round cake pans and line them with parchment paper. If you have a checkerboard cake pan set, prepare it according to the manufacturer’s instructions.
Second Step: Make the Cake Batter
In a medium bowl, whisk together the all-purpose flour, baking powder, and salt. Set aside.In a large mixing bowl, beat the butter and sugar together until light and fluffy, about 3-5 minutes. This step incorporates air into the batter, making your cake light and airy.Add the eggs one at a time, beating well after each addition. Then, mix in the vanilla extract.Alternate adding the flour mixture and milk to the butter mixture, beginning and ending with the flour mixture. Be sure to mix until just combined after each addition.
Third Step: Divide and Color the Batter
Divide the batter evenly into two bowls. Afterward, add the cocoa powder to one bowl and fold gently until fully incorporated to make the chocolate batter. Leave the other bowl as the vanilla batter.
Fourth Step: Create the Checkerboard Pattern
If using a checkerboard cake pan set, place the dividing rings in one of the prepared pans. Next, spoon the chocolate and vanilla batters into the rings, alternating colors to create the checkerboard pattern. Carefully remove the rings and repeat the process for the remaining pans.If you don’t have a checkerboard pan set, you can create your own template using cardboard and parchment paper. Simply cut out three rings of different sizes (e.g., 3 inches, 6 inches, and the full pan size). Place the largest ring in a prepared pan and spoon chocolate batter around it. Place the medium ring inside and add vanilla batter, then place the smallest ring and add chocolate batter in the center. Repeat with the remaining pans, alternating the starting color to maintain the checkerboard pattern.
Fifth Step: Bake the Cakes
Bake the cakes in the preheated oven for 25-30 minutes, or until a toothpick inserted into the center comes out clean. Let the cakes cool in the pans for 10 minutes, then remove them from the pans and transfer them to a wire rack to cool completely.
Sixth Step: Prepare the Frosting
While the cakes are cooling, prepare your buttercream frosting or any frosting of your choice. If you want a chocolate layer, prepare a simple chocolate ganache by heating 1 cup (240ml) of heavy cream (or coconut cream for dairy-free) and pouring it over 8 ounces (225g) of chopped chocolate. Let it sit for a few minutes, then stir until smooth.
Seventh Step: Assemble the Checkerboard Cake
Level the tops of the cakes if needed. Place one layer on a cake stand or serving plate. Spread a thin layer of frosting on top. Repeat with the second and third layers, ensuring the checkerboard pattern aligns correctly.Frost the sides and top of the cake with the remaining frosting. If using ganache, pour it over the top, letting it drip down the sides for a decorative effect.
Eighth Step: Decorate Your Cake
Finally, decorate the cake as desired. You can add sprinkles, chocolate shavings, fresh berries
FAQs: Frequently Asked Questions About Checkerboard Cake
Q: What is the origin of the checkerboard cake?
A: The checkerboard cake is thought to have originated in Europe in the late 19th century, although its precise origins are a bit murky. However, the cake’s design, inspired by the checkerboard pattern, became popular as an elegant dessert that offered both visual appeal and a fun surprise when sliced. Therefore, it’s believed that the cake’s pattern was influenced by the Victorian era’s love for structured and patterned foods, aligning with the elaborate presentations that were popular during that time.
Q: How do you keep a checkerboard cake from falling apart?
A: To keep a checkerboard cake from falling apart, make sure to level each cake layer so that they are flat and stack evenly. When assembling the cake, use a sturdy buttercream or ganache to help glue the layers together. Be gentle when handling the cakes, especially if they are very moist or delicate. For added stability, you can insert a few dowels or straws through the layers to keep them from shifting. Additionally, chilling the cake in the refrigerator for about 30 minutes before slicing can help the layers set and prevent them from sliding
Q: What is the rarest cake in the world?
A: The rarest cake in the world is often considered to be the “Luxe Gold Cake,” created by a bakery called Nobue Ikara. This cake is covered in gold leaf and filled with rare ingredients like truffles, saffron, and caviar. It’s not just the ingredients that make it rare; it’s also a bespoke cake made to order, costing upwards of several thousand dollars. Besides the Luxe Gold Cake, other contenders for the title include cakes that feature rare or highly expensive ingredients, such as the diamond-studded fruitcakes made by luxury bakers around the world.
Q: What is a Mary Jane cake?
A: A Mary Jane cake is a type of cake that is infused with cannabis, often using marijuana or cannabis-derived products such as cannabutter or cannabis oil. As a result, these cakes are particularly popular among individuals who use cannabis either recreationally or for medicinal purposes. The term “Mary Jane” is a slang name for marijuana, which is why these cakes are referred to as such. However, since the strength of a Mary Jane cake can vary greatly based on the amount and type of cannabis used, they are typically consumed in small portions to manage their potent effects. Therefore, it is important to consider the dosage carefully when enjoying this type of cake.

